In this article, you’ll learn how to draw text on canvas, position and update it in real time based on user input, as well as move, rotate and scale it.

In the previous article, we’ve shared our experience of how to create and manipulate Snapchat-like stickers for Android. It received really positive feedback, so we’ve decided to share our expertise of how to create similar text stickers as well.
Of course, images are much more popular than text. Nevertheless, an accurate expression can make the pics even funnier.
The content of this article is based on the previous implementation of image stickers - here.
Please, check that one before moving on.
Looking for extra hands? Hire Android Developers at Uptech.
Challenges
“Why not just simply use EditText?”, you might ask. Good question, btw.
First of all, EditText is a View, and comes with all its dependencies, like Context. This is inconvenient and an overhead in our case. Also, EditText would prevent us from using our solution outside of Android scope (ex: when exporting crafted image in the background thread).
Second, EditText can look differently, depending on the device or API version. We want our solution to be independent of the device and the OS version.
Thus, we’ve decided to use our own implementation for simplicity and flexibility.
Model
We’d want to reuse the Layer class from the previous implementation and add the necessary params: Font and Text. The TextLayer class would look like this:
Pretty simple, right?
There is one more important thing, however. Because we draw text on the bitmap, we don’t want users to scale the bitmap so that the text becomes blurred. To prevent this, we’ll limit the maximum scale of the text sticker to be 1.0. And in order to create bigger text, a user would have to increase the font size.
Drawing Multiline Text
When it comes to drawing multiline text on canvas, your best friend will most likely become StaticLayout — a Layout for text that will not be edited after it is laid out. I first stumbled upon StaticLayout in the blog post by Ivan Kocijan:
With StaticLayout drawing becomes pretty easy. Create a text Paint, create a StaticLayout, calculate the Bitmap size, position the text where necessary and just call staticLayout.draw(canvas). See the full code:
Below is a few example of how the text could look like with different colors, font typeface, and font sizes.

Note, that we could also use DynamicLayout — a text layout that updates itself as the text is edited. However, for the simplicity of this example, we decided to go with StaticLayout.
Text Appearance
Fonts are pretty simple to use. Put your “.tff” files into “.../src/main/assets/fonts” folder, and later extract them with the following command:
Typeface.createFromAsset(resources.getAssets(), "fonts/Helvetica.ttf");
Note: “Typeface.createFromAsset” is a heavy operation. In order to provide best user experience and prevent your UI from lagging — cache and reuse the typefaces.
For selecting the color you can use literally any library. We used fancy color picker by QuadFlask.
As an editing panel, we’ve added a simple layout of ImageButtons. The options are Decrease Font Size, Increase Font Size, Select Color, Select Font, Edit Text.

The value of the font size step (increase/decrease) was carefully crafted and after thousands of experiments was chosen 0.08. This value provides the best user experience possible. This is how we usually justify the existence of magic numbers in the code (:grinning:).
Capturing User Input
Now that we have everything we need to draw the text, it’s time to capture user input.
Yes, I know, we have this problem only because we didn’t use EditText. Nevertheless, I still believe it was worth it.
The original idea was to create a custom view that would capture user input. However, we wanted to implement it in such a way that keyboard would hide whenever user types anywhere on the screen (except keyboard, of course). With any view that would be hard, we don’t want to add zillions of click listeners.
One of the Android components that could be added nicely on top of almost anything is a DialogFragment. We added an invisible EditText in the Dialog that captured user input and passed through a callback to the parent Activity. A couple of magic attributes made the Dialog invisible and full screen:
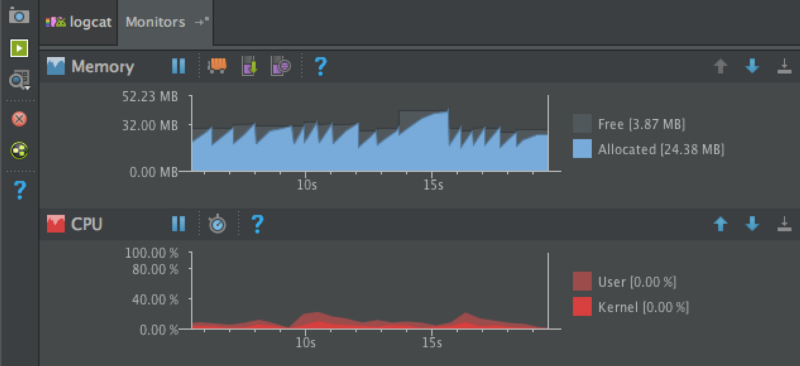
A good point to note is that whenever you work with graphics on Android — keep an eye on the memory monitor. It is usually a great indicator whether or not you’re doing smth wrong. When I glanced at graph while actively typing on the keyboard in the app, I noticed the following graphic:

Even though the overall memory consumption was OK, frequent leaps indicated that a lot of memory was wasted in vain.
A quick debugging revealed that I created too many unnecessary bitmaps (even though released them correctly). Basically, in the first implementation, a new bitmap was created every time the text changed. That was extremely inefficient.
A simple solution was to reuse the previous bitmap (if the size did not change). This is how the parameter “reuseBmp” was introduced to the method “createBitmap” in the class TextEntity.
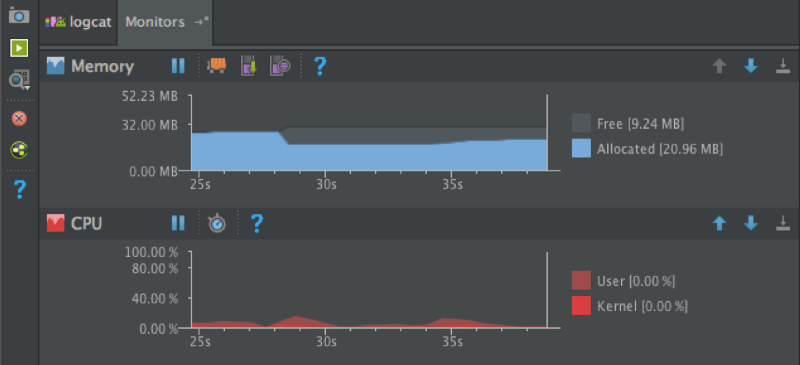
This simple optimization allowed to achieve a flat memory consumption chart, even when actively typing:

Note, how CPU usage also dropped when we started to reuse the Bitmaps.
Gestures
Because the TextEntity extended the MotionEntity class, the TextEntity automatically inherited all the manipulation features — moving, scaling, rotating.
We added just one more gesture for the text stickers: automatically start editing on double tap. Hopefully, Android can detect double tap with GestureDetector.SimpleOnGestureListener.
That’s it, no new gestures.
The Result
Check out the source code on the Github, download the app on Google Play.
Feel free to use it for your own purposes. Let me know if you have any challenges with it.
And what is your experience with drawing text on canvas on Android? And with manipulating this text? Feel free to share / ask questions in the comments, I would be glad to help.
We did the investigation of the topic for the #YoShirt app we’ve built here in Uptech.